
Doppel Named Official Partner of the New York Knicks
Partnership to Showcase Doppel to Knicks Widespread Audience Through In-Arena, Digital and Out-Of-Home Assets
The Attack Chain Has Already Changed — Most Defenses Haven’t
For over a decade, digital risk protection has been built around detecting and removing external threats: phishing domains, fake apps, and impersonation accounts, to name a few.
But attackers no longer operate in isolated channels or rely on static infrastructure. They run coordinated, multi-surface campaigns designed to exploit human trust, moving from reconnaissance to impersonation to engagement across platforms like social media, messaging apps, and domains.
Nearly 68% of breaches now involve the human element, and AI has made impersonation faster, cheaper, and more scalable. What used to be single-channel phishing attempts are now full-scale deception campaigns.
Legacy DRP tools weren’t built for this. They generate alerts and rely on manual takedowns, treating each artifact as a separate incident.
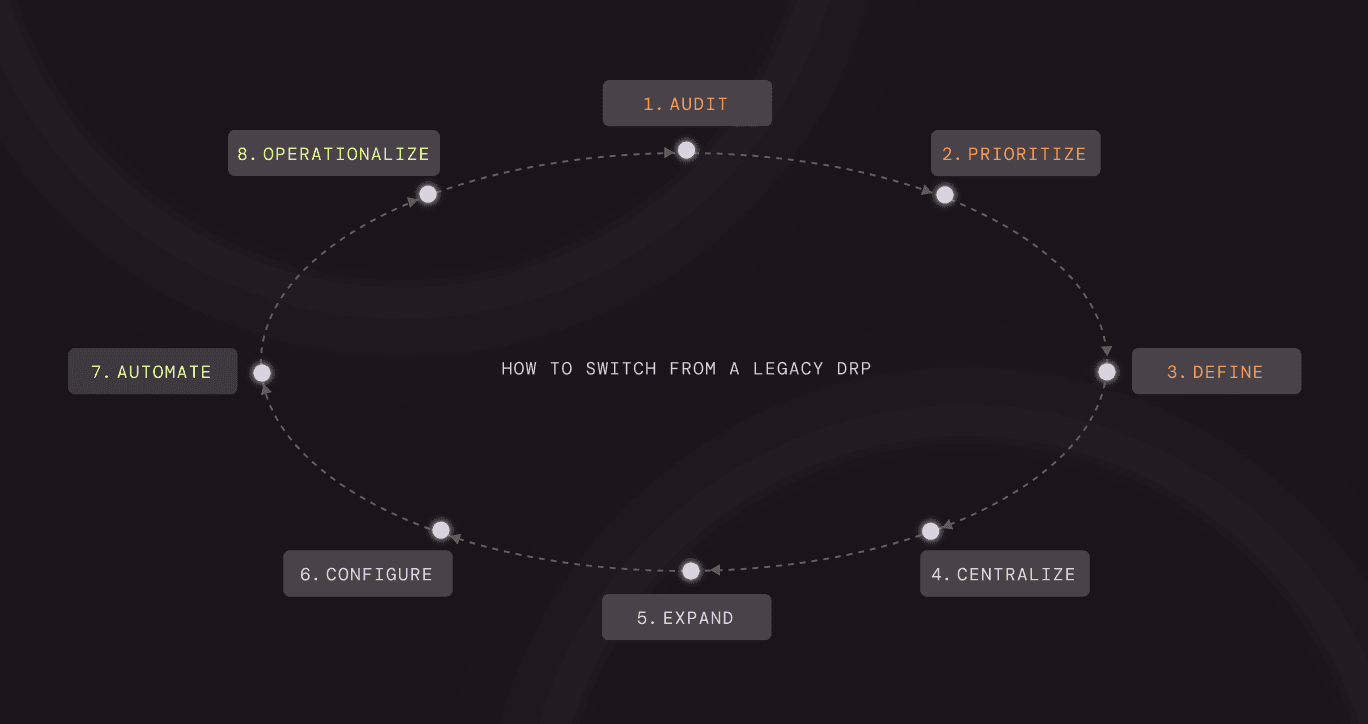
Switching to modern social engineering defense isn’t just a vendor change, it’s an operational shift. Here’s how to make that transition.
Start by pressure-testing what your current program actually delivers in practice, not what was promised.
Pull real data:
Then ask:
This step usually surfaces the core problem: generating signals, but not resolving campaigns.
Document these gaps clearly. They will become your migration requirements.
Your attack surface isn’t defined by your tool; it’s defined by how attackers target you.
Build a simple but explicit map:
Then operationalize it:
This gives you a risk-prioritized model of your external exposure, which should directly inform how you configure your new platform.
If you don’t redefine success, you’ll recreate the same problems with a new vendor.
Move away from metrics such as simply alert volume.
And define metrics like:
Also, define qualitative success:
These benchmarks will guide both rollout and long-term evaluation.
This is where migrations often fail, not because of detection, but because of fragmentation.
You want all external threat signals flowing into one system.
Consolidate:
Integrate into:
The goal is to create a single intake and triage layer so you’re not stitching together context manually across tools.
Now align coverage to where attackers actually operate.
Prioritize:
Then validate:
You’re not just filling gaps; you’re eliminating places attackers can pivot.
This is the core shift from legacy DRP.
Instead of reviewing alerts individually, configure your system to:
The operational impact is this:
This is what breaks the whac-a-mole cycle, shifting from reacting to individual artifacts to dismantling the campaigns behind them.
Detection without action doesn’t reduce risk.
Replace manual workflows with defined automation:
Establish:
The goal is to eliminate ticket queues and move to real-time, automated disruption.
Most organizations underutilize one of their best data sources: inbound reports.
Instead of treating phishing emails or scam reports as tickets:
This transforms employees and customers into a distributed network, feeding directly into and teaching detection and disruption workflows. The same real-world attack data can also drive simulation campaigns, training employees on the exact tactics they’re seeing and creating a continuous feedback loop between reporting, awareness, and resilience.
Once live, the goal is continuous improvement, not static coverage.
Establish regular review cycles:
Feed that back into:
Track long-term trends:
Over time, this creates compounding impact: faster response, fewer successful attacks, and lower operational load.
Most organizations think they’re simply upgrading a tool.
In reality, they’re replacing a model: moving from fragmented monitoring and manual response to unified, campaign-level disruption.
The result? Less noise, faster action, complete campaign visibility, and measurable risk reduction.
If you’re curious to see how your organization can benefit from the change, click here to book a demo. We’ll help you detect, correlate, and automate the takedown of sophisticated campaigns across every surface.


